Showing posts with label Holidays. Show all posts

Tuesday, December 24, 2013

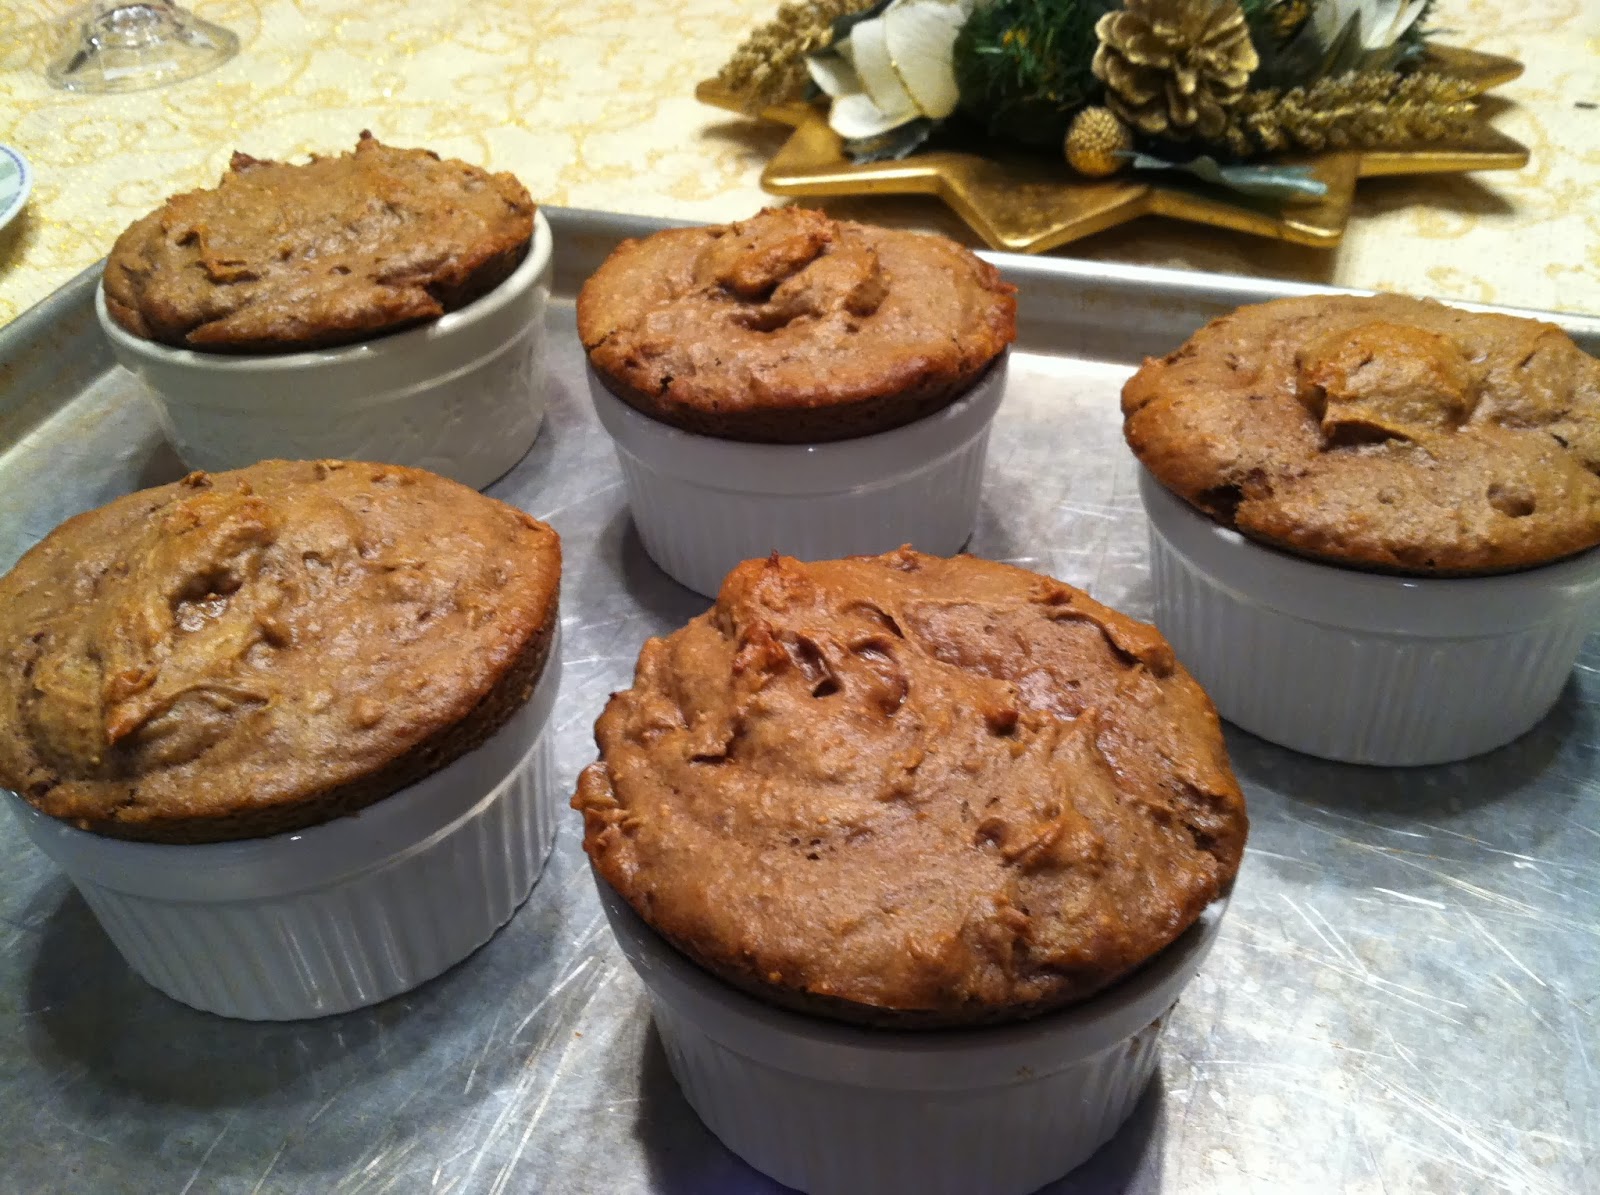
Figgy Pudding


 "Oh bring us some figgy pudding, oh bring us some figgy pudding, oh bring us some figgy pudding and bring it right now!"

Every time I hear that song, I always wonder what the heck is Figgy Pudding? I tried to make it last year but it was impossible to find figs at any of the grocery stores. This year however was much different. I started seeing them everywhere in October. I bought them whenever I saw them - Walmart, Smiths, the dollar store. What an abundance of figs!

We were so excited to make this since it dates back to the 16th century in England. Such an old desert that is in a popular Christmas song must be worth trying - right? Indeed it was. If you like bread pudding, carmel dumplings or gingerbread cake with butter sauce - you will love this! You must serve it with vanilla ice cream.

Figgy Pudding
  • 2 cups chopped dried figs
  • 2 cups water
  • 1 teaspoon baking soda
  • 100 grams (3 1/2 ounces or 7 tablespoons) butter, softened
  • 1 cup sugar
  • 2 eggs
  • 2 1/2 cups flour
  • 75 grams (2 1/2-ounces) dark chocolate, grated
  • Butter, for coating ramekins
  • Ice cream or whipped cream, for garnish
Sauce:
  • 2 cups brown sugar
  • 2 cups heavy cream
  • 14 tablespoons butter
  • Fresh  or dried figs, quartered, for garnish (I used raisins)
  • Vanilla ice cream, optional
  • Whipped heavy cream, optional

Preheat the oven to 350 degrees. Add the dried figs and water to a medium saucepan and bring to boil over medium heat. Remove the pan from the heat and stir in the baking soda. Let cool for about 5 minutes, then add to a blender and puree.

Using a hand mixer, cream the butter and sugar in a large bowl. Add the eggs and beat well. Fold in the flour, the pureed date mixture and the chocolate. Put the mixture into 4 buttered, 1-cup individual ramekins, filling halfway or slightly under. Put in the oven and bake for 20 to 25 minutes.

Prepare the sauce by stirring the sugar, cream and butter in a medium saucepan over low heat. Simmer until the sugar dissolves. Raise the heat and bring to a boil, then reduce the heat and simmer for 5 minutes. Add the butter and stir until incorporated.

Remove the ramekins from the oven and let stand for 10 minutes. May be served in the ramekin or unmolded onto a small serving plate. With paring knife cut a cross in the top of the puddings for the sauce.

Pour the sauce into the cross in the center of each pudding, then pour more sauce over the puddings and it allow to soak in slightly. Top with fresh figs and vanilla ice cream or heavily whipped cream. Serve warm. Enjoy!

Sunday, December 15, 2013

Candy Cane Twist Cookies


My mom used to make these when I was a little girl. I loved watching her roll them out and twist them. She would flavor hers with almond extract but I think peppermint is more fitting for a candy cane. These are so cute to serve with hot chocolate or to stir in a cold glass of milk. I made mine a bit larger for fun but if you chill the dough before you bake it they will not be so wide.  When I made these last night my kids were so excited and gobbled them up!

Candy Cane Twist Cookies
  • 1 cup sugar
  • 1 cup powdered sugar
  • 1 cup butter, softened
  • 1 cup oil
  • 1 tsp vanilla
  • 2 eggs
  • 4 1/4 cups all purpose flour
  • 1 tsp baking soda
  • 1 tsp cream of tartar
  • 1 tsp peppermint extract 
  • 3-4 drops red food coloring
  • 1 tsp salt

In a large bowl, cream sugar, powdered sugar, and butter until light and fluffy. Add oil, vanilla, almond extract and eggs.; mix well. Stir in flour, baking soda, cream of tartar and salt until well blended. Divide cookie dough in half and in separate bowls. In one bowl add the peppermint extract and red food coloring. Mix well until dough is colored. Cover both bowls with plastic and refrigerate at least 2 hours (I placed mine in the freezer for an hour instead). You need very cold dough for the cookies to hold shape in the oven.

Heat oven to 375 degrees.Take a finger full of white dough and red dough and on a floured surface, roll them each into snakes about 9 inches in length. Place each snake side by side and pressing ends, slowly twist the dough together as if you were twisting crepe paper until entire cane is twisted. (If your dough is too sticky add a little more flour to each finger full, if it's too dry and breaking add a tiny bit of shortening). Place on a cookie sheet and bend the top so it forms a candy cane shape. Wet your finger and pat down any cracked areas so your candy canes are smooth. Place cookies in freezer for 5 minutes before placing in the oven. Bake for 7-9 minutes. Allow to cool.

Place on cookie sheets and then place cookies in freezer for 5 minutes before placing in the oven. Bake for 7-9 minutes. Allow to cool. Enjoy!

3D Cookie Christmas Tree


When I was a little girl my mom used to make this Christmas tree tower. I don't remember it but my older sister does. My mom said that she and her mother used to teach classes how to make these. I had never seen one in person but after my older sister described it over the phone, it sounded pretty simple. The one that my mom used to make had a thin candle as the dowel that held the tree together. She would light the candle and use it as a centerpiece.

For the recipe you need star cookie cutters of different sizes but I just free handed it with a pairing knife on my cookie dough. I cut out several different sizes and then stacked them from largest to smallest. You'll want to also make quarter sized mini cookies to place in between each cookie to keep them from sticking and and ruining the pretty frosting. You can use a soda lid as your cookie cutter.

Any sugar cookie recipe will work but unlike normal sugar cookies you don't want these to be soft or they will crumble and your tree will fall apart. Avoid recipes with softeners such as cream, sour cream or cream cheese. I baked mine an extra few minutes and left them out a few hours so they were harder (but not too hard, still a little soft).

You will also want to take something small like a marker lid and poke a hole in the center of each of  your cookies so that you can stack them on a dowel. A great dowel to use is a chopstick. A prettier dowel would of course be a very thin candle that is the same width from top to bottom.

Sixlets make perfect little candy ornaments or on the baking isle where the cake decorating section is you can find candy colored balls. I was fortunate to have a bag of mini gummy stars in my pantry so I I used a yellow one as the star on top of the tree. Use this cute tree as your dinner centerpiece and for desert the kids will have fun removing these and dipping them in milk or hot chocolate.

There is plenty of dough so I recommend also making my candy cane twists with the extra dough. Check out that recipe here: http://cookwithlindsey.blogspot.com/2013/12/candy-cane-twist-cookies.html

3D Cookie Christmas Tree
  • 1 cup sugar
  • 1 cup powdered sugar
  • 1 cup butter, softened
  • 1 cup oil
  • 1 tsp vanilla
  • 2 eggs
  • 4 1/4 cups all purpose flour
  • 1 tsp baking soda
  • 1 tsp cream of tartar
  • 1 tsp almond extract
  • 1 tsp salt

Butter Cream Frosting
  • 3 cups confectioners' sugar
  • 1 cup butter
  • 1 teaspoon vanilla extract (I used raspberry extract instead)
  • 1 to 2 tablespoons of milk or whipping cream
  • 2-3 drops of green food coloring

Topping
  • 1 cup shredded coconut
  • 2 drops green food coloring 
  • candy for ornaments

In a large bowl, cream sugar, powdered sugar, and butter until light and fluffy. Add oil, vanilla, almond extract and eggs.; mix well. Stir in flour, baking soda, cream of tartar and salt until well blended. Cover with plastic and refrigerate at least 2 hours (I placed mine in the freezer for an hour instead). You need very cold dough for the stars to hold shape in the oven.

Heat oven to 375 degrees. Roll out cookie dough on a floured surface. Begin cutting different sizes of stars. You can make stencils on the computer and cut out on card stock. Then use the card stock stencils and place them on your dough. Use a small pairing knife to cut around the stars. Lift the cut stars and place them on a cookie sheet. 8-12 stars should be enough. I made a few extra just in case some of them broke. Using a soda lid or any lid smaller than a milk cap, cut out about 8-12 circles. Place on cookie sheets and then place cookies in freezer for 5 minutes before placing in the oven. Bake for 7-9 minutes. Allow to cool.

For frosting, in a medium bowl mix together sugar and butter. Mix on low speed until well blended and then increase speed to medium and beat for another 3 minutes. Add vanilla and cream and continue to beat on medium speed for 1 minute more, adding more cream if needed for spreading consistency. Add food coloring and mix well.

For topping, in a small bowl mix coconut and food coloring. Stir with spoon pressing down for about 10 minutes until coconut is green. (It takes a while for the coconut to mix with the food coloring. Do not add more food coloring thinking you don't have enough. 2 drops is plenty it just takes time. )

After cookies have cooled take a small marker lid and carefully pierce holes in the center of stars and round cookies. Frost cookies with green frosting while still on cookie sheets. Sprinkle coconut over tops and begin stacking cookies from largest stars to smallest stars on a pretty platter. Place a round cookie in between each star. Use a chopstick or thin candle as your dowel to place cookies on through center of holes. The dowel will keep your tree from tipping over. Decorate with candy ornaments and light candle for ambiance. Enjoy!

Monday, December 9, 2013

Lindsey's Stollen


This is a traditional Christmas bread in Germany and I decided I was going to surprise my husband with a homemade loaf to make his day! I really made this recipe my own and it turned out fabulous! The entire family gobbled it up in a day. It turns out that my mom's grandma who was from Germany used to make this all the time and my mom and her mom used to teach classes on how to make this bread way back in the day. I had no idea!

This is so yummy! The first time I ever tried stollen I wasn't a big fan. I thought it was dry and bland. There are different versions of it with different fillings and when I added my own fillings the flavor was perfect and it was so delicious! In my version there are bursts of citrus, cinnamon, and nuttiness. I never did like fruit cake or anything with candied fruit in it - but this my friends is not the same! My husband likes it cold but I like it warm right out of the oven. Either way you can't go wrong eating it!

Lindsey's Stollen
  • 3/4 cup milk
  • 1/2 cup water
  • 1/2 cup butter
  • 4 1/4 cups flour, divided
  • 1/2 cup sugar
  • 2 tsp salt
  • 2 Tbsp dry active yeast
  • 1 egg
Filling: 
  • 3/4 cup dried cranberries
  • 1/2 cup raisins
  • 1/4 cup chopped dried figs
  • 1/2 tangerine, sliced
  • 1/2 lemon, sliced
  • 1 tsp grated tangerine peel
  • 1 tsp grated lemon peel
  • 3 cups sugar
  • 2 cups water
  • 3/4 cup of chopped nuts (I used hazel nuts, almonds and walnuts) 
  • 1/2 tsp cinnamon
  • 1/2 tsp nutmeg
 Topping: 
  • 2 Tbsp melted butter
  • 1/2 cup powdered sugar

  For dough, heat milk, water and and butter in small saucepan until warm and blended (do not boil).

In a large bowl whisk 1 1/4 cups flour, 1/2 cup sugar, salt and yeast together. Add warm milk mixture and beat for 2 minutes. Add egg and 1 cup flour, beat another 2 minutes. Stir in remaining flour until batter is stiff.Transfer to greased bowl and cover with plastic. Let rise in a warm place for 1 1/2 hours.


Meanwhile for the filling, heat bring 2 cups of water to a boil. Add 3 cups of sugar, tangerine slices and lemon slices. Allow to boil for 30 minutes or until peels are tender and chewy like candy. In a separate bowl, add dried cranberries, raisins, figs, grated tangerine and lemon peel zest, nuts, cinnamon and nutmeg. When peels are finished boiling removed from liquid syrup. Remove any seeds. Chop the peels on a cutting board and add to mixture in bowl. Pour about 2 Tbsp of the citrus syrup into the fruit mixture and stir.

Remove risen dough and place on floured surface. Kneed fruit mixture into dough. Roll into a long sub shape and curve ends (like a crescent moon). Place on a greased cookie sheet, cover with plastic and allow to rise for another 1 1/2 hours in a warm place.

Heat oven to 350 degrees and bake for 35 minutes. Remove from oven and brush melted butter over the top. Dust with powdered sugar. Slice and serve!

Tuesday, October 29, 2013

Jell-O Popcorn


This popcorn is so easy to make and super yummy! You can change up the flavors to match any holiday or occasion. I used it for my Halloween visiting teaching treat. 

Jell-O Popcorn

  • 12 cups popped popcorn
  • 1 (14 oz.) can Eagle Brand® Sweetened Condensed Milk
  • 1 (3 oz.) package cherry or other flavored gelatin

Heat oven to 300ºF. Line large shallow roasting pan with heavy foil, extending foil over edges of pan. Butter foil. Place popped popcorn onto foil. Make sure kernels have been removed.

 Combine sweetened condensed milk and dry gelatin in medium saucepan. Heat and stir over low heat until mixture is slightly thickened and bubbly, 4 to 5 minutes. (for easy clean up soak in hot water immediately)

Pour mixture over popcorn. Stir gently to coat using a long-handled wooden spoon. Bake 20 minutes, stirring every 5 minutes. Carefully turn out onto large piece of lightly buttered foil. Cool. Break into pieces or clusters.


Monday, October 28, 2013

Vanilla Lime Cupcakes


I created this recipe for my daughter's third birthday party. The theme was princess and the frog and these were very fitting! 

I love adding jell-o to cake mix not only because you can create so many fun flavors and colors of cake by doing so  but also because of the chemical reaction that takes place. The batter foams and bubbles and becomes a little heavier. It ends up making the cake much more moist and fluffy. The lime tastes so delicious in these cupcakes and the cool, creamy and light vanilla topping just adds the perfect touch. I prefer my pudding topping to normal frosting any day.

Because these were frog themed, I used the gummy frogs and they were heavenly! If you wanted to stick with a lime or green theme then you could put those sugared gummy limes on top or even try the apple flavored gummy rings. You can't go wrong either way!

Vanilla Lime Cupcakes
  • 1 box white cake mix
  • (enough eggs, water and oil per requirement on cake mix directions)
  • 1 pkg lime gelatin

Vanilla Topping

  • 1 large tub of cool whip
  • 1 pkg vanilla pudding (dry)

Make cake mix according to directions on box. Add box of gelatin and stir in. Pour into greased cupcake tin. Bake according to directions on cake mix box.

In a medium bowl mix cool whip and dry vanilla pudding mix together until well blended. Set aside.

When cupcakes have cooled spread vanilla topping on top and decorate. Enjoy!

These cupcakes can be set out for hours and topping will not melt. As soon as topping is refrigerated, the cold temperature makes it difficult to spread so you want to make sure you don't refrigerate until after you have spread the topping onto the cupcakes. Store in an air tight container.


Friday, June 28, 2013

Five Minute Slushy


I could not believe how easy these are! Not only are they easy but the kids had so much fun making them. If your kids are bored this summer this gives them something to do and something to eat. My son has a slushy maker but it's so much work and you have to clean all the parts and it only makes a little bit. You spend about $25 buying one. This my friends, is much better!

I ended up saving the ice salt packs in the freezer and the cleaning out the gallon freezer bags so the kids can reuse them. Now that they know how to do this - they can do it themselves and they have quit asking for money every time the slushy truck comes through the neighborhood! Those slushies are $2-6 and a pitcher of koolaid is only 20 cents! Talk about a genius money saver!

I've been using tropical flavors and wowing our dinner guests with these babies! They are perfect with tacos and taco salads!

Five Minute Slushy

  • 1 quart sized freezer bag 
  • salt water
  • 1 gallon sized freezer bag
  • Koolaid

Take 1-2 Tbsp if salt and place in the quart sized bag. Fill with water and freeze. One bag is completely frozen take out of the freezer and place inside the gallon bag. Pour Koolaid into the gallon bag (making sure the frozen salt pack is sealed shut so it doesn't leak into koolaid). The less you pour in, the quicker it turns slushy. Seal the gallon bag and begin shaking! Try to grip the ice pack with the gallon bag as you shake or it could tear a hole in your gallon bag. Once the liquid turns slushy, take out the ice pack and scrape off the slush into a cup. Pour the rest into the cup. Enjoy!


Recipe found on http://charliebrownteacher.blogspot.com/2012/05/science-and-slushies.html

Wednesday, June 5, 2013

Sundae Cake

 
This is so easy to make and fun for celebrations or just a hot sunny day!

Sundae Cake
  • 1 cake mix
  • 1 tub of vanilla ice cream
  • Maraschino cherries 
  • Bananas, sliced
  • Nuts
  • Fudge topping
 Bake cake according to directions on box. Cool. Take tub of softened ice cream and spread over cake. Freeze for 2 - 4 hours. Cut into squares and serve over sliced bananas with nuts, fudge and cherries on top. Enjoy!

Monday, April 1, 2013

Strawberry Carrots


These are so fun for Easter and they taste wonderful!

Strawberry Carrots
  • 1 pkg of Almond bark (AKA candy coating)
  • orange food coloring
  • 2 pkg fresh large strawberries
Rinse strawberries. Melt almond bark in microwave according to directions on microwave. Stir in food coloring. Coat strawberries in coating all the way up to the green leafy part. Set on a platter or wax paper until coating is solid. Enjoy!

Thursday, February 7, 2013

Valentine Parfait

Mmmmm! This is super yummy and so beautiful. It's creamy and cold and who doesn't love cherries?

Valentine Parfait

1 can (21 oz) cherry pie filling divided
1 1/2 cups boiling water
1 pkg. (8 serving size) cherry Jell-O
1 1/2 cups cold water
4 cups angel food cake cubes
3 cups cold milk
2 pkg (4 serving size) instant vanilla pudding
1 tub (8 oz) cool whip topping, thawed and divided

Reserve 1/3 cup cherry pie filling for garnish, set aside. Stir boiling water into dry gelatin mix in large bowl at least 2 minutes until dissolved. Stir in cold water and remaining cherry pie filling. Refrigerate 45 minutes until slightly thick.

Place cake cubes in 3 quart glass serving dish. Spoon gelatin mixture over cake. Refrigerate 45 minutes until set but not firm.

Pour milk into large bowl. Add dry eat with whisk 2 minutes. Gently stir in 2 cups of whipped topping. Spoon over gelatin mixture in dish. Refrigerate 2 hours until set. Top with remaining whipped topping and reserved cherry pie filling. Enjoy!


Mini Cake Mix Dreams


You know me, I love my cake mix cookies!  I add fun variations on here all the time and here's my latest!

This was a last minute idea I came up with for a Valentine's Activity yesterday. It was quick, easy and from what I heard, DELICIOUS! They are creamy and oh so soft!

You can play around with this and try different options like lemon cake mix topped with raspberries. Call them raspberry lemonade cookies! Strawberry cake mix would be fun for a baby shower or Valentine's Day. Pistachio pudding (in the topping) for St. Patrick's day! Even carrot cake or red velvet cake mix would make some yummy ones using cheesecake pudding in the topping! Mmmm..and what about a banana pudding topping over chocolate cookies! Have fun and do share what you try!

Mini Cake Mix Dreams
  • 1 box of cake mix (I used white and chocolate)
  • 1 stick butter, softened 
  • 1 egg
  • 3/4 cup whipping cream (or sour cream) to make them extra soft
Topping
  • 1 large tub of cool whip
  • 1 pkg coconut instant pudding (or cheesecake)
  • 1 pkg of fresh strawberries, quartered 
Heat oven to 350 degrees. In a medium bowl add cake mix, butter and egg. Mix well. In a separate bowl whip cream together until stiff. Gently fold into cookie batter. Refrigerate dough for 2 hours. (If you skip this step your cookies will come out thin and flat. The cold temperature of the butter in the dough helps them hold shape in the oven). Shape dough into 2 inch balls and space 2 inches apart on a cookie sheet. 

Bake for 11 minutes. Cool and set aside. 

Meanwhile, open cool whip container and empty dry pudding mix inside. Blend well. Spread onto cooled cookies and top with strawberries. Refrigerate until ready to eat. The topping will turn into a thick mousse and will stay that way at room temperature. Enjoy!

Friday, January 4, 2013

Baked Brie with Cranberry Sauce

This is super delicious!! My husband is not a fan of cranberries but he loved this! I don't know what it is about berries and cheese but this is a perfect marriage!

Baked Brie with Cranberry Sauce

  • 3/4 cup cranberry sauce
  • 1 16-ounce brie round
  • Zest of one orange
  • 2/3 cup walnut pieces
  • Crackers for serving
Preheat oven to 350 degrees F. Remove the top of the rind from the cheese using a serrated knife, and discard the rind. Place the cheese, cut side up on an oven safe plate or bowl. Just make sure to use a larger plate or a bowl so your cheese doesn’t start oozing off the plate like mine is in the above photo. Bake at 350 degrees F for 10 minutes. Remove from the oven and top with the cranberry sauce. Bake for an additional 5 minutes, or until the cheese is soft and warm. Sprinkle the top with orange zest and walnuts. Serve immediately with crackers.

Thursday, November 29, 2012

Pumpkin Mousse Trifle


This is delicious and perfect for any holiday dinner! It's also pretty to look at. It's really easy especially if you buy an already made pumpkin spice pound cake. I found a delicious Paula Dean pumpkin spice pound cake at the Walmart bakery.

Pumpkin Mousse Trifle


      CAKE (You can skip this step and buy a pre-made pumpkin spice pound cake)
  • 1 cup sugar
  • 1 cup canned pumpkin
  • 1/3 cup canola oil
  • 2 eggs
  • 1 cup all-purpose flour
  • 1 teaspoon baking soda
  • 1 teaspoon ground cinnamon
  • 1/2 teaspoon salt
SUGARED PECANS
  • 1 egg white
  • 2 cups coarsely chopped pecans
  • 1/2 cup sugar
  • 1/2 cup packed brown sugar
  • 1/2 tsp cinnamon
PUMPKIN MOUSSE
  • 2 packages (8 ounces each) cream cheese, softened
  • 1-1/2 cups confectioners' sugar
  • 1 can (15 ounces) solid-pack pumpkin
  • 1 teaspoon ground cinnamon
  • 1 teaspoon vanilla extract
  • 1 carton (16 ounces) frozen whipped topping, thawed, divided
In a large bowl, beat the sugar, pumpkin, oil and eggs until well blended. Combine the flour, baking soda, cinnamon and salt; gradually beat into pumpkin mixture until blended. 

Transfer to a greased and floured 9-in. square baking pan. Bake at 325° for 30-35 minutes or until a toothpick inserted near the center comes out clean. Cool on a wire rack. Cut cake into 3/4-in. cubes.

Meanwhile, whisk egg white; stir in pecans, cinnamon and sugars. Transfer to a foil-lined baking sheet. Bake at 350° for 9-13 minutes or until puffed, stirring once. Cool completely. 

In a large bowl, beat cream cheese and confectioners' sugar until smooth. Add the pumpkin, cinnamon and vanilla. Fold in 1-1/2 cups whipped topping. 

In a 3-1/2-qt. trifle bowl or glass serving bowl, layer half of the cake, pumpkin mousse, remaining whipped topping and pecans. Repeat layers. Cover and refrigerate for at least 2 hours. Yield: 14 servings.

The Best Eggnog Ever! (made for eggnog haters)

Wow has it been a busy month, but I'm back! Here is a real treat for all you eggnog haters and lovers. My sister had told me about this brand of eggnog and how perfect it was. It's called Southern Comfort and I found it at Walmart and bought the Vanilla Spice flavor. Don't worry there is no alcohol in this it's found in the dairy section by the whipped cream.

This tasted like a vanilla milkshake whipped cream dream! If you have hated eggnog before or your family does, you have to try this! It's not rich and there is no strong nutmeg, egg flavor. Like I said tastes like a vanilla milkshake! I topped ours with whipped cream and dusted with cinnamon. The kids couldn't get enough of this drink!

Monday, October 22, 2012

Indian Corn Cookies


These are so cute for Fall and Thanksgiving! They are also super delicious - you can't just eat one!

Indian Corn Cookies
  • 1 pkg frozen sugar cookie dough
  • 1 can Pillsbury cream cheese frosting
  • 8 boxes of Reeses Pieces
  • 4 boxes of fruit roll ups (the multi-color kind are the only ones that have the color green in them)
Preheat oven according to directions on cookie dough package. Shape cookie dough square into a corn shape (pointed at the top and flat on bottom). Lay on cookie sheet. Bake according to directions. Cool 10 minutes. Spread frosting on top. Dot with rows of Reeses pieces. Take roll ups that have green in them. Carefully cut out the green strips. Cut into skinny triangles and place on the bottom of cookies for the husks. Enjoy!

Monday, October 15, 2012

Bowl of Bones


I saw this idea on Pinterest and I love it! They are so delicious and are the perfect party snack!!

Bowl of Bones
  • 1 package of white candy coating  (on the chocolate chip shelf - looks like a white chocolate candy bar)
  • 1 bag of pretzel sticks
  • 1 bag of mini marshmallows
Melt candy coating according to directions on package. Place mini marshmallows on the ends of pretzel sticks. Immerse in melted candy and lay on a sheet of wax paper to dry. Enjoy!!

Truffle Filled Cupcakes (Broomstick Style)


These won the cupcake contest at this year's family Halloween party. I'm telling you they are amazing!!

Truffle Filled Cupcakes (Broomstick Style)  

Truffles

  • 1-1/2 cups semisweet chocolate chips
  • 1/2 cup plus 2 tablespoons sweetened condensed milk
  • 1 teaspoon butter
  • 2 teaspoons vanilla extract
 Cupcakes
  • 1 package (18-1/4 ounces) devil's food cake mix
  • 4 eggs
  • 1 cup (8 ounces) sour cream
  • 3/4 cup canola oil
  • 1/2 cup water
  • 2 teaspoons vanilla extract
Topping
  • 1 large tub of cool whip
  • 1 pkg instant butterscotch pudding mix (dry) 
  • 1 bag small  Reeses pieces buttercups 
  • bag of pretzel sticks
  
For truffles, in a small saucepan, melt the chocolate, milk and butter over low heat; stir until blended. Remove from the heat. Stir in vanilla. Transfer to a small bowl; cover and refrigerate until firm, about 1 hour. Roll into twenty-four 1-in. balls; chill 1 hour longer.

For cupcakes, in a large bowl, combine the cake mix, eggs. sour cream, oil, water and vanilla; beat on low speed for 30 seconds. Beat on medium for 2 minutes.  

Fill paper-lined muffin cups 2/3 full of batter. Bake at 350° for 17-22 minutes or until a toothpick inserted near the center comes out clean. Scoop out a small hole in the top of each cupcake. Insert a truffle ball into hole. 

In cool whip container add dry pudding mix and stir well. Spread topping on cupcakes.  Unwrap buttercups and with a chopstick carefully pierce a hole in the top of each buttercup. Insert a pretzel for the broomstick. Serve chilled or at room temperature. Enjoy!


Thursday, April 12, 2012

Corn Pop Confetti Cups


This is such a fun snack idea for sports games or birthday parties. You can change up the colors for any holiday. Recces Pieces for Halloween, pastel M&Ms for Easter. Pink or blue M&Ms for baby showers and red and green M&Ms for Christmas. Try blue and yellow for Blue and Gold boy scouts banquets.

I created these for a fundraiser concession stand. They sold for $.50 a cup and were a hit! Because they are cereal and come in a cup with a spoon I can only imagine how much kids would love to pour milk in it and eat it as a cereal. Enjoy!


Corn Pop Confetti Cups
  • 1 1/3 c. sugar
  • ½ c. karo syrup
  • 1 1/4 c. butter (not margarine)
  • Bag of Corn Pops Cereal (use Barrel O’ Fun brand to get the large size shown above)
  • ½ tsp. baking soda
  • 1 tsp. vanilla

Mix sugar, karo syrup and butter together in a pan and cook over low heat to the softball stage. The softball stage is when you take a spoon full and drop it into cold water. If it instantly forms a soft ball then it has reached the softball stage. Add baking soda and vanilla & stir constantly, will be fluffy & frothy. Place corn 1/2 of corn pops in a large bowl or pan. Pour 1/2 mixture over 1/2 of corn pops, then pour onto waxed paper to cool, repeat.

After corn pops have cooled sprinkle M&Ms or candy onto corn pops. Scoop into plastic cups and place in cellophane bags. Tie ribbon around the tops and tape a spoon on the side. Enjoy!